Friday 8 February 2013

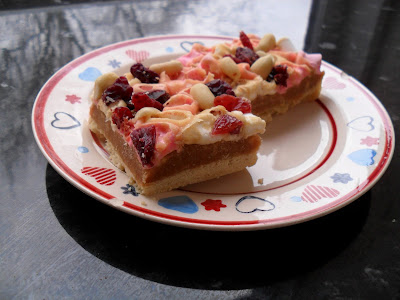
Marshmallow Butterscotch Biscuit Slices


Part biscuit, part butterscotch, plenty marshmallow and all delicious, these slices of heaven are hard to pigeonhole into one particular dessert category. I attempted these more as a bold attempt to try something new than because I thought they would actually work, although the sugar content alone was promising. Their picture in Cake Days by the Hummingbird Bakery had been staring at me tantalisingly since I first opened those magical pages, and one average day in February I finally decided to accept the challenge.

Let’s start with the bedrock supporting all that sugary joy. Actually, sugar plays an important role in the biscuit base, which contains plain flour, butter and icing sugar, rubbed together to form a dough. This is much easier to do if the butter is soft because you remembered to get it out of the fridge before you started. I did not. I’m not very good at getting butter to that optimum state that lies somewhere between solid enough to serve as some form of hammer and melted yellow pool. Microwaves, ovens and most recently radiators have all lured me into trusting them with my precious block of fatty goodness only to turn it into a mess and me into That Person who screams at kitchen appliances.  The moral of the story is, take the butter out of the fridge really far in advance, and never trust radiators with your food.

After that cautionary tale, we return to sugar, specifically the icing sugar in these biscuits. The Hummingbird Bakery has pulled off another genius move with this one. The fine, powdery texture of icing sugar leaves you with a biscuit that holds together neatly until you bite into it, when it just starts to crumble and release that delicate sweetness. You know when you open the bag of icing sugar, or try to mix it into butter, or even just look at a sealed box of the stuff, and it releases that puff that engulfs the room with a cloud of sugar? It’s like eating that, but without the choking and the coating of white dust that gets over everything, like ash from a particularly tasty volcano. It’s welldocumented that angels don’t bake and have too much self-control to eat dessert (and besides they’re contracted to Angel’s Delight and Philadelphia cheese), but if they did, they would be making and eating biscuits that taste like this.

If the concept of a crumbling, sweet biscuit layer has your mouth watering in a slightly undignified manner, consider the ingredients in this next part. The butterscotch is made of two types of sugar, golden syrup, butter, vanilla essence, crunchy peanut butter and double cream. Well, instead of cream I used soya milk, but with that much sugar there really wasn’t very much that could go wrong. Surprisingly, this theory held out throughout the rather intimidating process of getting the solution of sugars, golden syrup and water to the soft boil stage, which involves lots of bubbling, flooding of hobs, more bubbling, and tentative prodding of the angry-looking mixture.

I’d never made butterscotch before so I had no idea what to expect, although with that much sugar I assumed it would be tasty. Rather than over thinking it, I trusted the good book, performed a standard ritual dance and made a small sacrifice to the baking gods. They must have been on side because when it set, the bubbling, boiling mess had turned into smooth, edible, fall-apart-in-the-mouth butterscotch.

The really fun part of the process was testing to see if it was at soft-boil stage, which was a bit like being in a science lesson at school. The teacher tells you the probable outcome of an experiment and lets you get on with it. You hover over the chemicals, which look dubiously unreactive, and then, suddenly, everything bursts into life and there you are with a blaring fire alarm and a chunk of gold. Actually, in this case, you drop a tiny amount of the boiling mixture into a cup of cold water and watch in wonder as the little translucent bubbles the book so sincerely promised form before your very eyes.


The final aspects of this multilayered slice of joy were the marshmallows and nuts. The recipe recommended using 100g of marshmallows. I never thought that I would come out with the following statement, since it contradicts both the wise words of the Hummingbird Bakery and my own understanding of the world, but existential crises aside, that’s too many marshmallows. By the time I was through they looked like desperate pasty people jostling for space in the park on that one record-breaking hot day in summer. I will put marshmallows in any food going (except lasagne, that’s a crime) but these slices were just crying out for a health and safety inspector to declare them overfull.

Since the marshmallows were dominating the space, there wasn’t much room left for the peanuts. Any type of nut would have been fine but I only had these, and they are the friendliest members of the nut world. I managed to cajole and squeeze a few in, along with some dried cranberries for extra colour, but next time there will be a more equal distribution of ingredients. That being said, the marshmallows were the perfect texture for the butterscotch, since the warm mixture melted them slightly and gave them that just-off-the-bonfire chewiness even when the whole thing had been left to cool overnight. The nuts and cranberries added a bit of substance to the ethereal, sugary heaven, like that sensible but necessary voice that reminds you to eat the lettuce that comes with the cheeseburger and to zip up your pockets before you get on the rollercoaster.

If you’re looking for a challenge and mountain climbing seems like far too much effort, the butterscotch in this recipe requires attention but no spectacular skill level. Once you’ve got past that task, the taste of victory is sweet, melt-in-the-mouth, and devilishly divine.
Friday 10 August 2012

Raspberry and White Chocolate Cupcakes


Sometimes I worry that someone seriously miscalculated my year of birth. I will take my fur-lined slippers over anyone’s glitzy heel, prefer a mug of tea to a Jello-shot and the craziest club night could never tear me away from Strictly Come Dancing. A further habit that seems to suggest my twilight years have set in rather early is my love of cookbooks. I have been known to wake up, stomach rumbling, surrounded by books full with tempting recipes and bright photos that I took to bed (nice and early - I need my sleep) for future inspiration. My latest addition is Cupcakes From the Primrose Bakery, and it was from this that I took this week’s recipe for Raspberry and White Chocolate Cupcakes.


Since white chocolate is the least healthy of all chocolate, naturally it’s my favourite. Fortunately, the raspberries counter the unhealthy aspect. Right? I mean, if you forget about the butter and sugar, and jam... Moving on. The raspberry element to these cupcakes is threefold.  The mixture contains three tablespoons of raspberry jam, giving it the appearance of raspberry ripple (everyone’s favourite back in my day.)  When the cupcakes have cooled completely, a hole in the centre is cut out, filled with a dollop of jam, and replaced. To finish the cakes off, I added a raspberry on top, which looked rather good against the white of the chocolate.


The white chocolate icing recipe called for three tablespoons of the vanilla buttercream icing, which was slightly confusing since the recipe for the latter didn’t explain how much it made in tablespoons. I halved the quantities given in the recipe, and although I didn’t add the double cream in the white chocolate icing recipe, I was left with about two tablespoons left over. Without the cream, the white chocolate flavour really came through.


The raspberry flavour in the mixture was quite subtle, but the dollop of jam brought it out. The sweet white chocolate also tied in with the sharpness of the fruit, and made sure that they didn’t taste too healthy, because that’s just not what you want from a cake. Now where’s my hot water bottle.

Herbert IV and The Great Big Bucks Bake Off

The sun is out (for the moment), exams are over and the blog is back. Since healthy competition is currently taking centre stage, I thought I would mark my return to the cloud with a post about my own recent victory.

On the 28th July I came third in the Great Big Bucks Bake Off at the Eden Centre in High Wycombe. Since the competition was for eight inch cakes, I decided to go with something a bit unusual, and made a Hummingbird cake with cream cheese icing. Actually, I made three. I also followed my own tradition of naming Hummingbird cakes Herbert, so Herbert II (pictured below) came the week before the competition, as an experiment in taste and decorating.

Herbert II.0

I discovered that unlike well-behaved buttercream icing, cream cheese icing will turn into a gloopy, delicious mess if you add too much icing sugar. I also discovered that if they are in fact what they eat, my family and friends are nuts. The more the merrier. With these revelations in mind, I made Herbert III only a few days before the competition to make sure these tweaks all worked out.

Despite a few concerns I had with the icing, Herbert IV went reassuringly well. I managed to beat the icing just enough that it was smooth but also stiff enough to pipe. I put icing in between each layer and round the outside, decorating the top with pecan halves where the numbers on a clock would be, and put three roses in the centre. I left the cake in the fridge overnight, which gave the icing a chance to set until it was time to drop Herbert IV off in Wycombe.

Herbert IV: Cake it away

Like a nervous parent leaving their child at school for the first time, I anxiously watched as one of the supervisors put Herbert in his place and labelled him ‘Hummingbird Cake’. Would people stare at him and make nasty comments? Would they notice he was leaning a little bit? Would a small child stick in a mucky finger and send him careening hopelessly to the floor? Would the other cakes be nice to him? It was a nervous wait for judging.

On the table

A note on naming cakes: you will get attached and find yourself referring to them as ‘him’. This may lead people to think you are crazy. It also makes carrying them even more traumatic.

After nervously watching the divine Mary Berry produce a chocolate brownie to make a dieter weep with longing, I proceeded to nervously watch the judgers announce the winners. Fortunately, I didn’t have to wait long as they announced third place first! I was absolutely delighted, not least because I have never received a trophy before. I was so delighted that I almost forgot how to walk and/or talk, and my mouth developed a weird, manic twitch, which made smiling an interesting challenge. I also go an incredible shade of red when I’m embarrassed, so all in all the photos are rather dispiriting. However, the judges were all lovely, including Mary Berry, who seemed genuinely pleased for all the winners.

Berry pleased with my trophy

After the prizes had been handed out, the cakes were sold for charity. I decided that I wanted other people to try Herbert, so we bought a slice of the winning cake, an exquisite lemon cake. I later regretted leaving Herbert behind, when I was tortured with the thought that he might not have been bought.

Having a cake judged by people who are not obliged to swear through gritted teeth that it’s the most delicious baked product to ever grace the earth was a terrifying and fantastic experience, and I will be watching with bated breath and watering mouth when TheGreat British Bake Off returns to our screens on 14th August.

Friday 30 March 2012

Rainbow Cupcakes

As the end of term approaches, Uni life gets a bit surreal. The workload evaporates, people disappear to hometowns filled with real food and people over twenty five, and everyone makes the most of a final week with friends and freedom.  What better way to fuel the fun (food-wise, anyway) than stir fry, pizza and cake.  Fortunately I was kept away from the first two but I did promise to bring some form of cake-based creation.  Having spent the previous week making (or attempting) elegant, mother-appropriate Red Velvet cupcakes, I decided to abandon all dignity, embrace my inner-child and produce a rainbow.


Somewhat ironically, I got the idea while researching the Mothers Day-themed Flavour of the Month.  Rather than just use vanilla cupcakes which might not hide the taste of food colouring, I decided to use the Love Food: The Cupcake recipe for White Chocolate and Rose Cupcakes, substituting vanilla essence for the rose water, although this would work too.  I picked white chocolate because the mixture was still light enough to show the colours, and because of all the flavours in all the chocolate bars in all the world, white is my favourite.  I suspect that the high sugar content may have something to do with this.


Once I had made the mixture, I weighed it and divided it into five portions, with what would be the top (pink) layer with slightly more than the others, as it had a larger space to fill.  I dyed each in turn, using blue and red colouring for the purple, stirring carefully so that not too much air was lost.  I then layered the colours, starting with purple in the bottom.  The recipe didn’t stretch very far; I only managed to make nine, so next time I would probably double the quantities.  This also meant that some layers didn’t sit perfectly on top of each other, so it would be better to double the quantities if you are looking for a distinctly layered effect.   


For the icing I used the Love Food: The Cupcake vanilla butter cream recipe, which produces really fluffy, sweet, melt-in-your mouth, drool-over icing.  I wanted the topping to look quite plain because the sponge was so bright, but without looking dull or in anyway refined.  Again looking to my inner child (always a useful source of inspiration) I sprinkled edible gold glitter over everything and put a pink strawberry button on the top.


The cakes were slightly overcooked, but thankfully the white chocolate flavour still came through.  The colours inside produced a suitably joyous effect to delight children young, old and inner.  Whether you’re feeling blue, seeing red or going for gold, the rainbow effect is an easy, tasty, trippy way to add some colour to your celebrations.

Saturday 24 March 2012

Mothers Day Cupcakes


As much as I love traipsing around countless shops which have been plastered in pink and filled with scented candles, mum-friendly DVDs and chocolate, I decided that it would be more fun to bake my mum a present this year.  I decided on red velvet, as she had previously mentioned, in a slightly mystified way, that they seem to be really popular at the moment.  Normally, Mum is not one for food dye (blue food is a red flag in her eyes) so this seemed like a good opportunity to unleash my inner child on the rainbow while still making her happy.


I used the Hummingbird Bakery Cookbook for both the cupcake sponge and the cream cheese icing.  I also used muffin cases because these recipes are for American-style cupcakes, which are traditionally larger than English cupcakes.  However, the recipe only made eleven of these, whereas using smaller cake cases would, obviously, leave you with more cakes.


While I always enjoy baking, this recipe was particularly intriguing for two reasons.  Adding the distinctly brown cocoa powder/ food dye paste and watching the mixture turn red was a bit like watching a low budget but fascinating magic show.  On a similar note, the combination of bicarbonate of soda and vinegar brought back memories of papier-mâché volcanoes and the time when science was still fun.  I was a bit worried that these two oddities would reveal my baking ignorance (I went a bit Quentin Tarantino with the red food dye) and ruin everything, meaning a last minute dash to a garden centre.  However, the cakes rose (thank you God of Baking) and were definitely red.


I used cream cheese icing to top the cake, as I liked how the two colours contrasted.  As flowers are a traditional Mothers Day gift, I decided to make roses like the ones from Erin’s Birthday Cake.  I bought ready-made fondant icing and used liquid food dye in yellow, green, blue and pink to dye lumps of it, and for the purple I mixed the blue and red in a separate bowl before adding it.  I found that the easiest way to spread the colour evenly was to divide about two tablespoons of fondant in half, carefully putting about five drops of colouring (for a really bright colour) in the middle and then folding the fondant in on itself until the colour was spread consistently with no marble effect.  If the fondant is too cold or is left out, it will go hard and crumbly; if it is too warm, it will be slippery and will fall apart.  By the time I got to the last few colours, the fondant had gone quite hard.  However, the food dye made it softer, but not so soft as to be disobedient.  To find out how to make the fondant roses, click here.  My top tip would be to keep the petals an equal size, and to make sure that they are not much taller than the thin strip, as this makes them look slightly disproportionate.


While the roses were still far inferior to those in the tutorial, I was really pleased with how these cakes turned out.  In fact, there may even have been a small jig and musical number involved, but that’s another story.  More important than my response or musical ability was Mum’s reaction; she loved them, which just goes to prove that it is the thought that counts.  While the cakes saved me from sore feet and hours of hunting through pink chocolate-flavoured scented candles, they also meant that I got to eat cake.  Although this was delicious, the sweeter treat was being able to give Mum my time and appreciation in tasty cake form.

Tuesday 13 March 2012

Flavour of the Month - March 2012


With spring springing and reminding us that there is life beyond random bouts of snow and thermal underwear, it is time to celebrate not just Mother Nature but mums everywhere.  This Mothers Day, why not give your mum the opportunity to have her flowers and eat them?

Rose
A classic symbol of all types of love, these are probably the most popular flowers make for cupcakes.  For a video demonstrating how to make fondant roses, there is a link on the post for Erin’s Birthday Cake.

The aptly named Violet here shows how to ice a butter cream rose, including leaves, straight onto a cupcake.


Another example of a butter cream rose minus the leaves, this video is slower and shows the method more clearly.


Daisy
Reminiscent of carefree childhood days in which a chain of these was an acceptable present, these are perhaps one of the most appropriate flowers for a Mother’s Day cupcake.  While they look more fiddly than the roses, they are very effective and not too tricky.


Chrysanthemum
For those green-fingered mothers who are simply not satisfied with a traditional rose, the exceptionally happy Tengsern here shows how to ice a chrysanthemum onto a cupcake.


Sunflower
The perfect flower for a playful cupcake, this video shows how to ice a sunflower using a fairly simple method which will please fans of Oreos and butter cream icing.  No ladybirds were injured in the making of this video.


Bow
If your mum is not a flower fan, or suffers from severe hay fever brought on by iced imitations, this pretty fondant bow is a lovely alternative cupcake topper.


Still struggling for inspiration? Here are some of my favourite mother's day cakes to give you some ideas.  Click each image to visit the original website and discover more cake creations.

Gardener's World
Returning to the floral garden theme, this pastel-coloured garden cake is feminine without being, childish.  Particularly delightful are the little details, such as the flower on the cuff of the glove and the ladybirds.


I love you sew much
This careful construction is a spectacular tribute to those mothers who prefer sewing fabric over seeds.  Another example of the beauty in fine details, this has a tape measure, cotton reels and buttons to complete the picture.


Mum's the word
Finally, for those who like to court controversy, this is a tongue-in-cheek reminder of the reason mothers deserve a break; just make sure she is feeling suitably well-treated when you bring it out. 


Happy Mothers Day to all mums reading, and particularly my own mum, Julie.
Need to remind someone of this important fact?
Buy the handy magnet here


Wednesday 7 March 2012

Erin’s Birthday Cake


In something of a promotion from my last birthday-related cake-based project, I have moved from making the accompanying cupcakes to the main event.  That’s right; this time, I got to make the one with the candles, the theme song and the massive amounts of fondant icing.


A lot of love, labour and chocolate went into this cake.  It took me about four hours all in all, leaving my friend and I just enough time to deliver it to Frankie & Benny’s before the arrival of the birthday girl.  Aside from the aforementioned ingredients, it also involved a lot of planning.  Before the meal, a few people were going to Cadbury World to consume large amounts of free chocolate and ride around in a cocoa bean.  While I love chocolate and would never eat anything else (except ratatouille, cheeseburgers and bacon) if it were in any way practical and socially acceptable, I thought that in this case chocolate cake might be a bit too much.  I had a recipe for strawberry cake which I thought might do.  Cue an undercover mission involving much confusion over the nature of Bakewell tarts in order to find out whether Erin likes strawberries.  Having ascertained that she doesn’t mind them, I exhibited a tremendous lack of imagination and decided to make chocolate cake (well, bacon has its limitations as far as cakes go).

For the triple-layered chocolate sponge I used the Hummingbird Bakery’s recipe for Brooklyn Blackout Cake.  I had used it before, for the Clown Cake, and it proved to be just as reliable this time, with a lovely crumbly sponge texture and rich flavour.  For the filling I halved the chocolate custard recipe from the same page in The Hummingbird Bakery Cookbook.  It was the strangest thing I have ever made.  If the caster sugar, golden syrup, cocoa powder and water boiling on the stove was not concerning enough, the gloopy, gluey Flubber-like cornflour and water mixture looked entirely inedible.  However, when the two were combined, it somehow, inexplicably, worked, which just goes to support the theory that adding chocolate to anything can only improve it (unless that thing is bacon).


The trickiest bit was the decoration.  While I take a neurotic and creative pride in the appearance of all of my cakes (including the resiliently messy Mississippi Mud Pies), this cake, as a birthday cake, had to look particularly special.  Having spent a while pondering, I had an epiphany in a truly inspirational place: the baking aisle of Sainsbury’s in Selly Oak.  In order to carry out my vision, I found a video on YouTube which showed how to make a simple rose out of fondant icing, which is something I had wanted to try.  The video is quick but very clear and helpful, and can be found here.  I made a few the night before, also experimenting with food dye.  While the video recommends using colouring paste, I found that a small amount of liquid food dye (much easier to get hold of) does not affect the rigidity of the flower too much.  I used bright pink food dye on a lump of white fondant icing large enough for nine roses (well, twelve), which would mean everyone going could have a rose and they would all be a consistent colour.  I made them while the cakes were in the oven, and while they are simple to make they are trickier to really refine; the sizing was slightly inconsistent and some of them looked more rose-like and delicate than others.  However, all together they seemed to work.

Over Christmas, my Grandma and I decorated a fruit cake using fondant icing and those small silver balls widely regarded as a marvel akin to sliced bread and the pyramids.  We cut a snowflake shape out of the icing, stuck the icing to the cake, then filled the shape with the balls.  I decided that rather than writing Erin’s name on the cake in my typically shaky, small-child style, I would cut her name out and fill it with the pink sparkles that had been missing from Mum and Aunty Jane’s Birthday Cupcakes.  I rolled out the fondant and cut around the outside of the cake tin to get the right size and shape, then cut her name out in the middle of the cake.  Thankfully, ‘Erin’ is as short as it is pretty, and has lots of lovely straight letters, so it was not that difficult.  Having smoothed some more chocolate custard over the top, I very carefully lifted the icing and placed it on the top.  Cutting around the tin had helped but I still had to straighten the edges and smooth it all out a bit once it was on the cake.  I then filled each letter with a sizable amount of pink sparkles, trimmed the ends of the roses and pressed them gently round the letters.


Having finished, I could not quite believe that everything had gone according to plan.  Nothing broke, nothing was undercooked, the mysterious icing mixture came together, the roses looked at least vaguely like roses, the name was readable and vaguely in the centre and nothing fell off.  Of course, it wasn’t perfect; the angle it was leaning at made a certain Italian tower feel threatened, a few of the roses more closely resembled cabbages and the fondant wasn’t a perfect size.  However, as I handed it over to the very nice people at Frankie & Benny’s and asked in an alarmingly motherly way if it could sit somewhere cool, I felt very proud of my creation.  Fortunately, Erin appreciated having cake presented to her in public, accompanied by loud music and balloons.  She loved the cake and was genuinely grateful, which meant a lot.  Even those friends who had been to Cadbury World and never wanted to see chocolate again were nice enough to force down a slice and say it tasted good.  This all suggests, to my mind at least, that public displays of friendship and birthdays go better when cake is involved.